This section describes the user roles involved in the publishing workflow and a step-by-step view of this process.
Publishing workflow user roles
This workflow is based on specific two user roles that must be assigned to users by the Exalead CloudView administrator:
• Linguist is a business user who:
◦ Proposes new semantic packages using the Business Console.
◦ Publishes resources for use in actual processing.
• Administrator is a technical user (consulting, IT...) who:
◦ Configures the resource usage in the product.
◦ Manages the technical deployment of resources on multiple hosts.
◦ Deploys the resources from pre-prod to production.
Publishing workflow steps
The following table describes the publishing workflow steps that can be performed in the Business Console > Semantic menu by the Linguist and the Business administrator.
Step
Who
For details, see...
1
The linguist(s) defines the content of the semantic resource, tests it if applicable and submits his draft for approval.
This locks the resource which changes from Draft to Submitted for approval status.
(Optional) The Business administrator may also want to view the resource history of all approved versions and rollback to a given version, to redeploy it afterwards.
The following procedures detail how to perform each step of the publishing workflow.
Enable the publishing workflow
This procedure explains how the Exalead CloudView administrator enables a standard publishing workflow in the Business Console.
1. The Exalead CloudView administrator assigns Linguist and Business administrator roles to users. For more information, see "Default roles" in the Exalead CloudView Administration Guide
2. In the Administration Console, the Exalead CloudView administrator must create and deploy the semantic resources that will be defined in the Business Console. The requirements depend on the semantic resource type, for details, see the Exalead CloudView Configuration Guide
3. In the Business Console, the Exalead CloudView administrator must enable the publishing workflow by selecting Misc > Configuration > Semantic Resources > Enable approval workflow.
Submit for validation
If you do not have Administrator rights, after completing the resource changes, you may submit the resource for validation.
1. In Semantic > Resources, select the resource to submit and then select Review & Publish.
2. Under Submit for approval, click the Submit button.
The resource now has the status Submitted for approval and will be locked until it is approved.
Review a single resource
You must have Business administrator rights to review resources.
1. In Semantic > Resources, select the resource to review and then select Review & Publish.
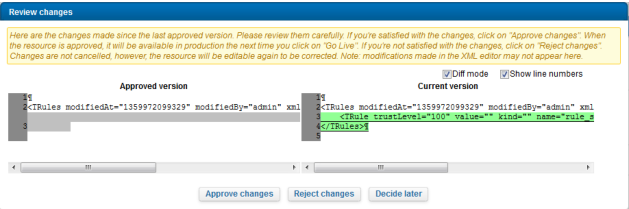
2. Under the Approval section, click Review changes.
This displays the proposed changes for the current version of the resource file. Only the differences are shown on what has changed since the last approval for the given resource.
3. From here, you can:
◦ Approve changes – this approves the changes for the selected resource only
◦ Reject changes – this unlocks the resource file for further editing
◦ Decide later – do nothing and close this window
Review several resources
You must have Business administrator rights to review resources.
1. In Semantic > Resources, select the resources to be reviewed and click the Review resources button.
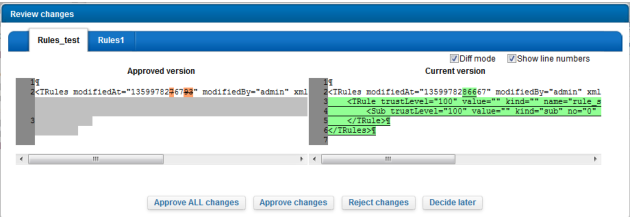
This displays the proposed changes for the current version of the resource file(s). Only the differences are shown on what has changed since the last approval for the given resource.
2. From here, you can:
◦ Approve ALL changes – (available only when more than one resource is selected) this approves the changes for all the selected resources.
◦ Approve changes – this approves the changes for the selected resource only
◦ Reject changes – this unlocks the resource file for further editing
◦ Decide later – do nothing and close this window
Publish the resources
You must have CloudView Administrator rights to publish resources.
1. In the Business Console, click Go Live.
2. If one or more resources are have been modified, you will be prompted with a list of modified resources. You can select the resources you want to publish.
3. Click Accept.
This deploys the resource to all hosts and sets the resources to Published.
View and manage resources history
The Exalead CloudView administrator can specify the number of versions that will be kept in history in Misc > Configuration > Semantic Resources> Max versions kept.
1. In Semantic > Resources, select a resource and go to the History tab.
2. This tab allows you to:
◦ View resource versions.
◦ Download specific versions of a resource in all supported formats (xml, xls, csv). Once downloaded, you can edit the content of the file into a simple editor like Excel, and import the modified content back using the Edit tab Import file button.
◦ Rollback to a specific version. Rollback operations completely overwrite the content of draft versions. If the resource was not in draft status, it will turn to draft after the rollback operation.