To get started with the JDBC Database connector, you must first select a driver, set the connection parameters and test the connection. Once the connection is established, you can enter a valid SQL query that allows you to automatically retrieve the fields for selection. To do so, you need a thorough understanding of SQL databases.
Exalead CloudView provides a direct connection parameter to connect to your JDBC Database sources called the Connection string. You can provide the JDBC Database name, server address, and account information if required.
For example, jdbc:mysql://<HOSTNAME>:<BASEPORT>/DATABASE
The following is a sample procedure for configuring a Native MySQL database.
1. In the Connection Parameters pane:
a. In the Driver field, select one of the drivers installed. For example, com.mysql.jdbc.Driver
b. In the Connection string field, enter the JDBC URL of the Database. The syntax varies depending on the driver selected, for example, jdbc:mysql://<localhost>/northwind
c. In the User field, enter the username of the Database account to use.
d. In the Password field, enter the password for the account.
Note: If the password for that account is changed, you must also change it in Exalead CloudView.
2. Click Test connection.
The JDBC Database connector automatically connects to the JDBC Database, and the message Connection is ok displays.
3. Click Apply.
4. After you verify the JDBC Database connection, specify the queries that select the table fields to be crawled in the Query parameters pane. See Specify the Query Parameters.
Specify the Query Parameters
Documents are built by selecting columns from ordered lists returned by synchronization queries.
To index your database, you can configure the connector to use:
• A full synchronization mode and index the document corpus entirely.
• Or one of the incremental synchronization modes to push only a fraction of your database. Use incremental modes when your table contains either:
◦ A timestamp representing the time of insertion
◦ A unique serial number generated with AUTO_INCREMENT
During incremental synchronization, the connector fetches the current timestamp or serial number of the column, and populates a variable in the incremental query to retrieve new rows from the database.
For more information, see "Implementing Synchronization" in the Exalead CloudView Connector Programmer's Guide
Step 1: Select a Synchronization Mode
The JDBC Database connector uses synchronization modes based on different indexing methods. You must first select one of them.
Mode
Description
Full synchronization
Pushes every document contained in the database when a Full Scan occurs (see Controlling Connectors).
This mode does not perform incremental synchronization.
Column-based incremental synchronization
This incremental synchronization mode performs:
• a first full synchronization as described in the Full synchronization mode
• and calculates the maximum values contained in the Checkpoint column. Supported SQL types for the maximum calculation are TINYINT, SMALLINT, INTEGER, BIGINT, TIMESTAMP, and DATE.
This mode performs subsequent synchronizations as follows:
• The Incremental variable is populated in the Incremental query with the maximum value and used for the synchronization.
• A new maximum value is calculated.
Query-based incremental synchronization
This mode is similar to the Column-based incremental mode except that is based on a query instead of a column checkpoint. A query, run before each synchronization, calculates the maximum value.
Trigger-based incremental synchronization
You can configure additional queries to maintain tables that keep track of added, updated, and deleted rows. Use these queries to set up triggers and maintain additional tables.
For large databases (> 1.000.000 entries), when indexing is not automatically run after a completed scan (Force indexing after scan option cleared), plan enough time between the initial scan and the first incremental scan to make sure that checkpoints are computed properly. Alternatively, you can click Force commit (Administration Console > Home > Indexing section) to make sure that all documents have been indexed before running your first incremental scan.
Step 2a: Define the Main Parameters
The other parameters for the database queries are based on the selected synchronization mode. The required and optional parameters of each mode are described in the following procedures.
Important: The JDBC connector does not insert quotes automatically when populating values in incremental and fetch queries. This means that you must surround variables by quotes for dates and strings.
A typical incremental query using an integer column to select new documents: SELECT * FROM table WHERE id_column > $(id) becomes, for example, SELECT * FROM table WHERE id_column > 42.
A typical incremental query using a stamp column to select new documents: SELECT * FROM table where stamp_column > {ts '$(stamp)'}. Once again, use quotes here.
A typical fetch query using a varchar column: SELECT * FROM table where id_column = '$(id_column)' becomes, for example, SELECT * FROM table where id_column = 'FRA0001' . If you omit quotes, the query would be: SELECT * FROM table where id_column = FRA0001, which is not a valid SQL query.
Important: For Query-based and column-based incremental synchronization, you can define an incremental variable to populate the incremental query:
• Either by a verbatim string substitution (default option),
• Or by a driver variable substitution, which allows you to apply the same SQL value on different RDBMS.
To edit this option, go to the Advanced tab and configure the Checkpoint replacement mode property as required.
For the Full Synchronization Mode
1. Specify an Initial query to synchronize the entire document corpus. For example: SELECT * FROM table
2. Optionally, specify an All URIs query or a Fetch query.
For the Query-Based Incremental Synchronization Mode
1. Specify an Initial query to synchronize the entire document corpus. For example: SELECT * FROM table
2. Specify a Checkpoint query to fetch the value of the checkpoint stored in the Incremental variable. For example: SELECT MAX(stamp_column) FROM table or SELECT NOW()
3. Specify an Incremental variable that is to say, the variable name to populate in the Incremental query (contains the value of the Checkpoint query). For example: STAMP
4. Specify an Incremental query to perform incremental updates. For example: SELECT * FROM table WHERE stamp_column > '$(STAMP)'
5. Optionally, specify an All URIs query and/or a Fetch query.
For the Column-Based Incremental Synchronization Mode
1. Specify an Initial query to synchronize the entire document corpus. For example: SELECT * FROM table
2. Specify a Checkpoint column, that is to say the name of the column stored in the Incremental variable used with column-based incremental synchronization. For example: stamp_column
3. Specify an Incremental variable that is to say, the variable name to populate in the Incremental query (contains the value of the Checkpoint column). For example: STAMP
4. Specify an Incremental query to perform incremental updates. For example:SELECT * FROM table WHERE stamp_column > '$(STAMP)'
The connector will populate '$(STAMP)' with the maximum time stamp found in the column and use the query. For example: SELECT * FROM table WHERE stamp_column > '2011-11-25 11:25:00'
5. Optionally, specify an All URIs query and/or a Fetch query.
For the Trigger-Based Incremental Synchronization Mode
1. Specify a Checkpoint query to fetch the value of the checkpoint used as Incremental Start Variable.
2. Specify an Incremental Start Variable that is to say, the variable name that will be used to identify the next scan run.
3. Specify an Incremental Variable that is to say, the variable name that will be used to identify the last scan run.
4. Specify an Initial Query to synchronize the entire document corpus. For example: SELECT * FROM table
5. Optionally, for Initial, specify:
◦ In Initial Pre Queries: The queries to run before the first synchronization.
◦ In Initial Post Queries: The queries to run after the first synchronization. For example: CREATE TABLE eventTable(id INT, action VARCHAR(1)) CREATE TRIGGER after_test_insert AFTER INSERT ON testTable REFERENCING NEW AS NEW FOR EACH ROW INSERT INTO eventTable VALUES (NEW.id, 'N')
6. Specify an Incremental query to perform incremental updates. For example: SELECT * FROM table WHERE id IN (SELECT id FROM eventTable WHERE action = 'N')
7. Optionally, for Incremental, specify:
◦ In Incremental Delete Queries: The queries to run to compute documents that will be deleted during incremental synchronizations. For example: SELECT * FROM eventTable WHERE action = 'D'
◦ In Incremental Pre Queries: The queries to run before incremental synchronizations.
◦ In Incremental Post Queries: The queries to run after incremental synchronizations. For example: DELETE FROM eventTable WHERE action = 'N'
8. Optionally, specify an All URIs query.
◦ In All URIs pre queries: The queries to run before the deletion process.
◦ In All URIs post queries: The queries to run after the deletion process.
9. Optionally, specify a Fetch query.
Step 2b: Define Optional SQL Queries
The following table describes the optional queries that can be defined for each synchronization mode.
Query
Description
All URIs query
The query used to list all document URIs in the database and compare them with those in the index.
You can use it to detect entries deleted from the database, and reflect these deletions in the index. Write it to go through the primary keys of all the tables crawled by Exalead CloudView.
For example:
SELECT products.productid,attributes.langid FROM products,attributes WHERE products.productid = attributes.productid
... selects all the rows corresponding to the union of the two primary keys productid and attrid.
This query allows Exalead CloudView to quickly mirror deleted rows from the database.
Note: The field names that make up must be the same as the names returned by the main query.
This query does not perform any accumulation. When a record belonging to an accumulated document is removed from the database, the document is left unchanged in the index.
Fetch query
The query used to fetch documents for previews. The preview lists the selected columns of every row returned by the query.
This query does not perform any accumulation.
Mapping names prefixed by a dollar sign ($) are populated with the corresponding values contained in the document URI.
For example, given an indexed document with the URI: customerID=550& and a Fetch query:
SELECT * FROM customers WHERE customerID = $(customerID)
The connector processes the query as follows:
SELECT * FROM customers WHERE customerID = 550
and uses this query to fetch the required document.
Step 3: Define Advanced Parameters
In More options, you configure the following optional advanced parameters.
Field
Description
Auto commit
In trigger-based synchronization, select the auto commit mode on connection:
• true: the database makes the commit
• false: the JDBC connector makes the commit
Read only
Specifies if the connection to the database is read-only.
Options: true|false|<empty>
Query timeout
Specifies the query execution timeout in seconds.
Options: <int>|<empty>
Max. field size
Specifies the maximum number of bytes to return for character and binary column values in a result set.
Options: <int>|<empty>
Max. rows in RAM
Specifies how many rows a result set can contain at a time. When exceeding the maximum number, rows are dropped and not loaded in the result set. Your JDBC driver may not support that.
Verbose
Enables the debug mode in logs for the connector only.
Fetcher class
Specifies a custom fetcher class (java code) to fetch documents. Enter the class name.
Custom classes must be in a jar file located in the connector directory: <DATADIR>/resource/all-arch/builtin_plugins_deployed/jdbc-java-connector
Recommendation: Use the following settings when the database contains many files or text parts or if you encounter OutOfMemory errors:
• Auto commit: false
• Read only: true
• Max rows in RAM: lower the default value (5000)
• Result set type: FORWARD_ONLY
• Result set concurrency: READ_ONLY
Define the Fields to Crawl
To retrieve the fields you must first configure the connection parameters, test the connection and enter the queries that select the table fields as previously shown.
About Accumulation
Accumulation is the aggregation of field or column values on multiple rows that represent a single document. The Column Processor associated with this column determines the accumulation behavior. Accumulation occurs on consecutive rows that have the same document URI.
Retrieve and Configure the Fields to Crawl
1. Click Retrieve fields at the bottom of the Query parameters pane.
This automatically populates the connector with the table fields based on the query. You can then configure the parameters and column processors for each field as follows.
2. In the Fields selection pane, select the use this field check boxes of the fields to be handled by the connector.
3. Choose the selected fields that must be a part of the document URI by enabling their Use as primary key check boxes.
The set of fields or columns included in the document URI determines how rows are accumulated.
Note: There must be at least one field set as the primary key, otherwise Exalead CloudViewcannot crawl the JDBC Database.
4. In Meta Name, enter the meta name or part to be added to the document. For example, id is pushed as the meta name.
5. Specify whether the field must be in verbose mode. For example, enter false if you do not want the verbose mode.
6. Click Add column processor to add a new processor to the field.
An arbitrary number of processors can be associated with each field. These processors are responsible of handling field or column values. See Column Processors below.
7. Click Apply to apply changes to the configuration.
Our JDBC SQLite driver is able to retrieve data coming from BLOBs (Binary Large Objects) in a database table. BLOBs are typically image files like .jpg stored in dedicated table columns. To retrieve BLOBs, map them to the master part.
1. In the Fetch query field, enter a query like the following to fetch data from the BLOB column:
select blob_id, blob_img from blobtable where blob_id=$(blob_id)
2. In the Fields selection pane, expand the field in which you want to store BLOBs.
3. Click Add column processor.
a. Select Multiple Parts.
b. Click Accept.
4. In the Multiple Parts column processor configuration, for Part Name, enter master.
5. Click Apply to apply changes to the configuration.
You are now ready to scan and index your documents with BLOB files. See also Controlling Connectors.
Column Processors
The column processors are described in the table below. All standard processors also accept the Verbose mode parameter.
Processor
Description
Automatic
Acts either like the Multiple Parts processor on BINARY/BLOB values or like the Multiple Metas on all other columns. If a meta is pushed, then its name is the value of the Meta Name setting; if a part is pushed, its name is master.
Average Meta
Max Meta
Min Meta
Total Meta
Calculates the average/maximum/minimum/total value of the column and push the result as a meta with the name Meta Name.
These processors accept the Multiplier parameter. The result is multiplied by the Multiplier. This allows CloudView to push double values (double or floating) as integers.
Concatenate as meta
Concatenates every value of the column and pushes the resulting string as the Meta Name meta. It accepts the separator parameter. The separator value is inserted between the different row values.
Concatenate as part
Concatenates every value of the column and pushes the resulting string as a part with the name Part Name. It accepts the separator parameter. The separator value is inserted between the different row values.
Document Filter
Ignores or deletes the current document. It accepts the Ignore Value and Delete Value parameters.
When the value of the column equals the Ignore Value (IGNORE by default), the resulting PAPI document is not pushed.
When the value of the column equals the Delete Value (DELETE by default), the resulting PAPI document is deleted from the index.
File Attach Part
Pushes every value of the column as a part with the name Part Name. It accepts the following parameters:
• Encoding - encoding hint added to the resulting part.
• Encoding Column - column containing encoding hints added to the resulting part (overrides encoding).
• Prefix - prepended to the file name when attempting to load it.
• Suffix - appended to the file name when attempting to load it.
• Mime - mime hint added to the resulting part.
• Mime Column - column containing mime hints added to the resulting part (overrides mime).
First Value as Meta
Last Value as Meta
Pushes only the first/last value (respectively) of the column as a meta with the name Meta Name.
First Value as Part
Last Value as Part
Pushes only the first/last value (respectively) of the column as a part with the name Part Name.
Custom
Custom code processes every value of the column. The Class Id parameter is the java class of the column processor. You can enter additional parameters.
Map Value as Meta
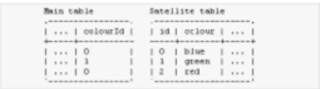
Maps a column with a column found in another database (called satellite database). The mapped values are then pushed as metas with the name Meta Name. This processor accepts the following parameters:
• Class Name Class of the satellite database driver.
• Connection String - connection string used to connect to the satellite database.
• Query - query used to list the values of the satellite table. This query produces results containing exactly two columns. The first column contains values to be populated. The second column contains replacement values.
• Login - login used when connecting to the satellite database.
• Password - password used when connecting to the satellite database.
Example:
By attaching a Map Value as Meta processor to the column colourId, and setting the satellite query to:
SELECT id,colour FROM satelliteTable
This allows you to populate color ids with color names.
Multiple Metas
With this processor, every value of the column is pushed as a separate meta value with the name Meta Name.
Multiple Parts
With this processor, every value of the column is pushed as a separate part. The first part is pushed with the name Part Name. Subsequent parts are numbered, for example, Part Name is master, subsequent parts are named master_1, master_2.
This processor accepts the Filename Column parameter, which designates a column that contains file names to be associated with pushed parts.
Row Num URI
With this processor, an identifier (integer) is generated and mapped automatically for each row of the tables that do not have a primary key.
The enumeration order must stay stable over different enumerations. If not, Document URIs may become different over time and updates are not reliable.
Unique Metas
With this processor, every unique value of the column is pushed as a separate meta with the name Meta Name. This is the same as Multiple Metas but duplicates are removed. Order of values is kept.
Examples of JDBC Database Connector Configurations
This section gives examples of JDBC connector configurations.
Index Cleanup
You can perform a query in All URIs Query to detect entries that were deleted from the database, so it can replicate these deletions in the index. Write this query to go through the primary keys of all the tables crawled by Exalead CloudView.
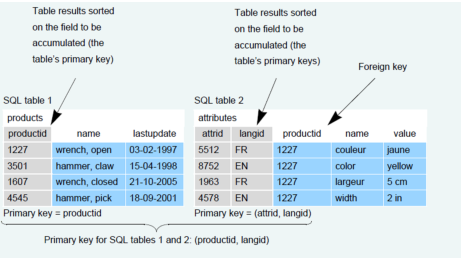
The following example shows a two table database to index with Exalead CloudView.
In SQL table 2, the productid field is a foreign key of the productid field stored in SQL table 1. The goal is to configure Exalead CloudView to index one product for each language langid.
For example, the SQL query:
SELECT products.productid,attributes.langid FROM products.attributes WHERE products.productid = attributes.productid
This selects all the rows corresponding to the union of the two primary keys productid and attrid. This query costs relatively little, and it allows CloudView to quickly mirror deleted rows from the database.
The field names that make up these keys must be the same as the names returned by the main query.
Accumulation is not performed in this step. When a record belonging to an accumulated document is removed from the database, the document is left unchanged in the index.
Accumulation
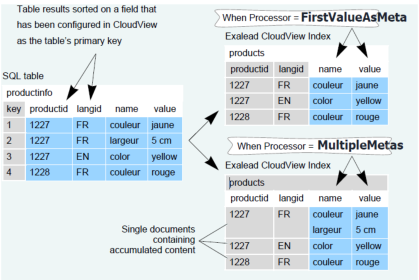
The following example shows how the accumulation affects the indexing of a database table where productinfo contains many rows for each product.
Each row details a product specification that has been translated into many languages.
The goal is to accumulate all product specifications into a single document for each language in Exalead CloudView index. To do this, the Initialquery must sort the results on the productid field and the langid field with the following SQL query:
SELECT * FROM productinfo ORDER BY productinfo.productid,productinfo.langid
Note: For accumulation to work, write the query to sort the database results on the fields defined as primary keys for this table.
Set the productid field and the langid field to be the primary keys for the table (as the primary key of the SQL table is of no search value). In this scenario, there may be more than two rows that have the same value for the primary key (productid, langid) to be indexed.
When you set the processor to First Value as Meta then only the first value for the name and value fields are kept.
When you set the processor to Multiple Metas then the name and value fields are merged for the rows.
Configuring Trigger-Based Synchronization with Two Checkpoints
To make sure that scanning operations in progress do not miss any record, you can define two checkpoints for your trigger-based synchronization.
For this example, we use the database located in <INSTALLDIR>/docs/sample_database/data.db.
1. Customize the Database
We first customize the database to:
• Add a product_order_log table.
• Create 3 triggers for update, create, and delete operations.
Run the following SQL queries:
DROP TABLE IF EXISTS product_order_log; CREATE TABLE product_order_log ("id" INTEGER PRIMARY KEY NOT NULL , "event_date" DATETIME NOT NULL DEFAULT CURRENT_TIMESTAMP, "action" CHAR); DROP TRIGGER IF EXISTS product_order_update_trigger; DROP TRIGGER IF EXISTS product_order_create_trigger; DROP TRIGGER IF EXISTS product_order_delete_trigger; CREATE TRIGGER product_order_update_trigger UPDATE ON product_order BEGIN INSERT INTO product_order_log ("id", "action") VALUES (old.id, "U"); END; CREATE TRIGGER product_order_create_trigger INSERT ON product_order BEGIN INSERT INTO product_order_log ("id", "action") VALUES (new.id, "C"); END; CREATE TRIGGER product_order_delete_trigger DELETE ON product_order BEGIN INSERT INTO product_order_log ("id", "action") VALUES (old.id, "D"); END;
• Checkpoint query: This query computes the checkpoint value based on the current date and time in the database.
Use the following query:
SELECT datetime('now') FROM product_order limit 1
• Incremental variable: This variable corresponds to the last checkpoint value (that is, computed during the last scan)
Enter: previousCheckPoint
• Incremental start variable: This variable corresponds to the next checkpoint value (that is, computed during the next scan)
Enter: currentCheckPoint
4. Configure Initial Query Parameters
Configure your initial query parameters as follows:
• Initial query: Synchronize the entire table.
Use the following query:
SELECT id, date, quantity, customer_id, product_id, store_id FROM product_order
• Initial post queries: Delete triggers whose event date is before the initial scan run.
Use the following query:
DELETE FROM product_order_log WHERE event_date < '$(currentCheckPoint)'
5. Configure Incremental Query Parameters
Configure your incremental query parameters as follows:
• Incremental delete queries: Compute which documents need to be deleted.
Use the following query:
SELECT id FROM product_order_log WHERE event_date between '$(previousCheckPoint)' AND '$(currentCheckPoint)' AND action='D'
• Incremental query: Compute which documents have been created or updated since the last scan.
Use the following query:
SELECT p.id id, p.date date, p.quantity quantity, p.customer_id customer_id, p.product_id product_id, p.store_id store_id FROM product_order as p, product_order_log as l WHERE p.id=l.id AND l.event_date between '$(previousCheckPoint)' AND '$(currentCheckPoint)' AND l.action in ('C', 'U')
• Incremental pre queries: Delete triggers whose event date is before the last scan run.
Use the following query:
DELETE FROM product_order_log WHERE event_date < '$(previousCheckPoint)'