To define your deployment, add secondary servers and configure them with specific roles that determine their function within the deployment.
For complete deployment role details, see "Appendix - Deployment Roles and Related Processes" in the Exalead CloudView Administration Guide.
When you add a new secondary server, you can duplicate an existing host's configuration. This creates the roles you require for a combined index and search host automatically. However, you can manually edit the host configuration as explained in the procedures below.
Add a New Secondary Server
1. In the Administration Console, select Deployment > Roles.
2. On the Roles page, click Add host.
a. Enter the Host Name of the secondary server, for example, server002.exalead.com
b. Enter the Install Name of the secondary server install, for example, secondary1.
c. If required, modify the Base port, Host agent, and Last port with the new secondary server's port range.
3. Click Accept.
4. On the Add roles window, add the roles required for your deployment then click Accept.
For more information, see the specific configuration steps for how to:
For several maintenance or administration operations, you will have to restart Exalead CloudView.
Restart Exalead CloudView in the Administration Console
1. In the Processes section, select the host you want to restart from the Host list.
2. Click Restart CloudView on this host at the bottom of the home page.
This restarts all the processes for the selected host.
Restart Exalead CloudView in Windows
1. To restart the registered Windows service, use the Microsoft Management Console or enter the following command:
net stop "Exalead CloudView - cvdefault"
2. Then
net start "Exalead CloudView - cvdefault"
where cvdefault is the default Exalead CloudView master install name.
Restart Exalead CloudView in Linux
1. From <DATADIR>/bin/, enter:
./cvinit.sh restart
Configure Roles
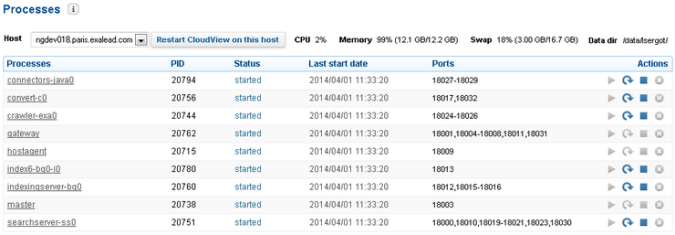
Each deployment role corresponds to a Exalead CloudView process, which displays on the Home page of the Administration Console.
For a description of all roles and their options, see "Appendix - Deployment Roles and Related Processes" in the Exalead CloudView Administration Guide.
Figure 8. By adding roles to a host, you install Exalead CloudView processes on that machine, which you can manage from the Administration Console’s Home page.
Add a Combined Search and Index Server
1. On the new secondary server, click Add roles.
2. On the Add roles window, select the Index role and all the Search roles:
◦ Mashup UI
◦ Mashup API
◦ Search API
◦ Search Server
◦ Storage Service
3. Click Accept.
4. Configure the Index role:
a. Select the Build group such as bg0.
b. For Instance name, enter a name such as i0.
5. Configure the Search Server role:
a. For Instance name, enter a unique name such as ss1.
b. For API port, enter a port number, for example, baseport + 10.
c. For UI port, enter a port number, for example, baseport.
d. Select HTTPS if you need to use SSL for the hosted Mashup UIs; see also "Enable HTTPs for the Mashup UI" in the Exalead CloudView Administration Guide.
6. Configure the Search API role:
a. For Search server instance, enter the instance name specified in step 5.
7. Configure the Mashup API role:
a. For Search server instance, enter the instance name specified in step 5.
b. For Instance name, enter a unique name such as ac1.
c. For Mashup application, enter your application name, if not using default.
8. Configure the Storage Service role:
a. For Search server instance, enter the instance name specified in step 5.
b. For Instance name, enter a unique name such as sts1.
9. Configure the Mashup UI role:
a. For Search server instance, enter the instance name specified in step 5.
b. For Instance name, enter a unique name such as mu1.
c. For HTTP context path, enter the path for the application such as /mashup-ui.
d. For Storage service instance, enter the instance name specified in step 8.
2. On the Add Roles window, select all the Search roles:
◦ Mashup API
◦ Search API
◦ Search Server
◦ Mashup UI
◦ Storage Service
3. Click Accept.
4. Configure the Search Server role:
a. For Instance name, enter a unique name such as ss1.
b. For API port, enter a port number, for example, baseport + 10.
c. For UI port, enter a port number, for example, baseport.
d. Select HTTPS if you need to use SSL for the hosted Mashup UIs. For more information, see "Enable HTTPs for the Mashup UI" in the Exalead CloudView Administration Guide.
5. Configure the Search API role:
a. For Search server instance, enter the instance name specified in step 4.
6. Configure the Mashup API role:
a. For Search server instance, enter the instance name specified in step 4.
b. For Instance name, enter a unique name such as ac1.
c. For Mashup application, enter your application name, if not using default.
7. Configure the Storage Service role:
a. For Search server instance, enter the instance name specified in step 4.
b. For Instance name, enter a unique name such as sts1.
8. Configure the Mashup UI role:
a. For Search server instance, enter the instance name specified in step 4.
b. For Instance name, enter a unique name such as mu1.
c. For HTTP context path, enter the path for the application such as /mashup-ui.
d. For Storage serviceinstance, enter the instance name specified in step 7.
While most of the deployment scenarios covered in this guide use the default search target, the scenario shown in Recommended Deployment uses a local-only search target. With a local-only search target, the search server only searches indexes that are on the same machine.
1. In the Administration Console, select Deployment > Build groups > Search Targets.
2. Delete the default search target, st0.
3. Click Add search target:
a. For Name, type st0.
b. For Type, select Local only.
c. Click Accept.
4. In the settings for this new search target, under Build groups, select the target build group.
5. Click Apply.
Add a New Build Group
When you add a new build group, you can add it to an existing host, or create a new slave host for the build group.
This new build group can use the same data model and indexing server configuration as the original build group (bg0), or you can create new ones for it.
1. To deploy the new build group on its own host, add a new slave host.
Important: For more information, see Add a New Secondary Server. However, for step 4, do not add an Indexing server role when adding this new host. When you create a new build group (in the steps that follow), this role is added to the target host automatically.
2. In the Administration Console, select Deployment > Build groups.
3. Click Add build group and specify the required information:
a. Enter the Name, for example, bg1.
Note: You cannot change the build group name once created.
b. For Deploy on this host, select the target host.
c. For PAPI server port, specify an available port.
4. Select different configurations for the following:
a. Data model: the classes and properties this build group must use to generate the index.
b. Indexing config: the index compaction policy and trigger conditions.
5. Modify these indexing options:
a. To deploy the index for this build group on a different host, clear Deploy index replica on same host.
b. Change No. of slices.
6. Click Accept.
This creates the new build group, and also adds the Indexing server role and an Index role (unless you cleared this option) to the target host.
7. For Document cache, you can disable the cache for the build group.