You can add authentication to your application by defining a security provider.
Once a security provider has been applied to an application, it is possible to enable the security on one or several pages of this application.
Note: The Mashup framework provides built-in support for standard Exalead CloudView security sources but you can also implement your own front-end security provider using the Mashup Builder SDK.
The following procedure describes the setup of a standard Exalead CloudView security provider to use Exalead CloudView security sources.
We assume that a security source named ldap has been properly configured in the Administration Console. For more information, see "Configuring security sources" in the Exalead CloudView Administration Guide
1. In Mashup Builder, select Application from the top left menu bar.
2. Select General > Security.
3. Click Add a security provider.
4. From the Add security provider dialog box, select the Exalead CloudViewSecurity Provider.
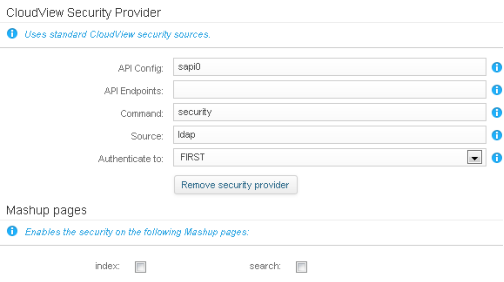
5. Configure the security provider.
In Source, select a security source that has previously been configured in the Administration Console, for example ldap.
See the following table if you want to configure the other properties.
Property
Description
API Config
Indicates the name of the default Search API as defined in the Applications menu, for example sapi0.
API Endpoints
Defines the URL that will be used by the Search API. For example: http://<HOST>:<PORT+10>
Command
Specifies the authentication command. Default is security.
Source
Enter the name(s) of your CloudView security source(s).
Authenticate to
Select the authentication behavior of your security source(s). By default, the first source will be used for authentication.
6. In the Mashup pages section, select the pages of your application on which you want to enable security.
7. Click Save.
An Authentication Required dialog box asking for your credentials is added to the page(s) on which security was enabled. These credentials are the ones defined in the security source.
Add a Kerberos Security Provider
This section describes the setup of a Kerberos security provider to secure the access to your application pages.
The installation procedure requires to:
• Pre-authenticate as a host, using a HOST set of credentials and a keytab.
• Install the spnego plugin (ask it to the Exalead CloudView Support team).
If you want to secure the application sources, you can define a security source in the Administration Console. For more information, see "Configuring security sources" in the Exalead CloudView Administration Guide.
Prepare the Kerberos configuration files
You first need to generate the kerberos configuration files and copy them to a folder on the host running Exalead CloudView.
1. Ask your system administrator to generate the files required to connect to the Kerberos server on the host on which Exalead CloudView is running. These are:
2. Your system administrator must also add a principal name, using the following commands:
◦ setspn for Active Directory,
◦ or kadmin add_principal command for MIT Kerberos.
The principal name must have the following format: HTTP/<Server name as shown in the browser URL>
Note: See your browser’s documentation to enable Kerberos authentication.
3. In the Administration Console, add a security source (for instance a unix security source) to fetch security tokens.
Install the spnego plugin
1. Ask the Exalead CloudView Support team for the spnego plugin.
2. In Mashup Builder, select Application from the top left menu bar.
3. Select Manage components > Plugins.
4. Click Upload plugin and select the spnego plugin.
Add the Kerberos Security Provider to your application
1. In Mashup Builder, select Application from the top left menu bar.
2. Select General > Security.
3. Click Add a security provider.
4. From the Add security provider dialog box, select the Kerberos Security Provider.
5. Configure the Kerberos security provider.
◦ For spnego.login.conf, enter the relative or absolute path of the login.conf file.
◦ For spnego.krb5.conf, enter the relative or absolute path of the Krb5.conf file.
◦ For Source, enter the name of your Exalead CloudView security source.
◦ See the following table if you want to configure the other properties.
Property
Description
spnego.login.conf
[Required] Path to login.conf file (relative or absolute path)
spnego.krb5.conf
[Required] Path to krb5.conf file (relative or absolute path)
spnego.preauth.username
Enter the Network Domain user name. For Windows, this is sometimes referred to as the Windows NT user name.
spnego.preauth.password
Enter the Network Domain password. For Windows, this is sometimes referred to as the Windows NT password.
spnego.login.server.module
Enter the server module name specified in the login.conf file.
spnego.login.client.module
Enter the client module name specified in the login.conf file.
spnego.logger.level
Specify a logging level to define the amount of details to display. Valid values go from 1 to 7 (1 = FINEST; 7 = SEVERE). Set value to 1 for debugging/verbose logging.
spnego.prompt.ntlm
The SPNEGO Filter does not support NTLM.
Set this value to true if clients who wish to authenticate via NTLM should be offered Basic Authentication (assuming spnego.allow.basic=true).
Set this value to false if NTLM Authentication should be rejected.
spnego.allow.unsecure.basic
With respect to Basic Authentication, specify if HTTPS is required. If Basic Authentication is not allowed, this operation is a no-op.
Set this value to false if you do not want to offer Basic Authentication for non-SSL connections.
spnego.allow.localhost
This property is set to false by default, which means that requests coming from local host will not require authentication.
Set this value to true if you run a local instance of the server and you want to avoid having to register an SPN for your workstation.
spnego.allow.basic
Valid values are true or false.
Offer HTTP Basic Authentication in addition to Kerberos Authentication.
Consider this option if an HTTP client cannot negotiate SPNEGO token(s).
Set this value to false if you only want to allow Kerberos Authentication.
API Config
Indicates the name of the default Search API as defined in the Applications menu, for example sapi0.
API Endpoints
Enter the URL that will be used by the Search API. For example: http://<HOST>:<PORT+10>
Command
Specifies the authentication command. Default is security.
Source
[Required] Enter the name(s) of your CloudView security source(s) if any. The security source is defined in the Administration Console. It fetches user security tokens.
For more information, see "Configuring security sources" in the Exalead CloudView Administration Guide.
Authenticate to
Select the authentication behavior of your security source(s). By default, the first source will be used for authentication.
6. In the Mashup pages section, select the pages of your application on which you want to enable security.
7. Click Save and apply your configuration.
On your mashup application, the secured page(s) should not ask for your credentials as Kerberos is an SSO protocol. The retrieved credentials are the ones defined in the security source.