The following table describes the various Feeds available in Mashup Builder Premium edition. The Mashup Builder edition only contains the Exalead CloudView Search and Exalead CloudView Data Model feeds.
Mashup Builder Premium Edition - Feeds
Category - Feeds
Description
CloudView Feeds
CloudView Data Model
This feed is linked to the data model defined in the Administration Console. Its search capabilities are therefore enhanced by the classes, semantic types, advanced processors, etc. used in the data model.
CloudView Search
This is the standard Exalead CloudView search feed.
It is independent from the data model defined in the Administration Console. It works for search on versions V6R2012x and higher.
Database Feeds
Advanced JDBC Query
This feed allows you to query a JDBC database directly.
You need to specify the following SQL queries:
• One to retrieve results with both a LIMIT and an OFFSET clauses (for pagination).
• One to retrieve the total number of results.
• One to retrieve only one result (when a hit is opened directly via its URL).
Drupal Query
This feed allows you to query a drupal database (Opens Source CMS tool) directly.
JDBC Query
This feed allows you to query a JDBC database directly.
You need to specify a single SQL query to retrieve results.
Feed Tools
Concat Feeds
This feed must gather one or more subfeeds (nested feeds).
It merges the hits of feeds based on their IDs. A comparison is performed and if:
• IDs are equal, only one hit is displayed for the two feeds.
• IDs are different, all hits are displayed.
Note: Concat feeds do not support synthesis. You cannot use this feed on widgets rendering synthesis, for example, the Pie Chart widget.
Joined Feed
This feed must gather one or more subfeeds (nested feeds).
It combines the hits of nested feeds based on a join key meta. A comparison is performed and if:
• Keys are equal, only one hit is displayed for the two feeds.
• Keys are different, all hits are displayed.
Add a feed
The CloudView Search feed is usually at the very heart of your application. As already stated, it is independent from the data model defined in the Administration Console.
Everything that can be done using the Search Logic, can also be done at query time by the CloudView Search and the CloudView Data model feeds. Using these feeds to perform the query is a way to capitalize the default Search Logic when you have specific needs. For example, if you want to call Exalead CloudView with a few parameters that are different from those defined in the default Search Logic, you don’t need to create another Search Logic and you can just edit these parameters at the feed level instead.
This section describes how to add a CloudView Search feed and configure its main properties.
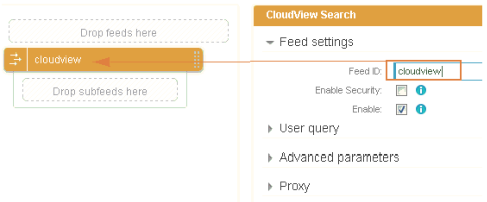
1. In Mashup Builder, select an application page, for example, the index page.
2. Select the Feeds view.
3. Drag a CloudView Search feed in the drop zone.
4. In the Feed properties panel, expand the Feed settings section and using the Feed ID field, call it cloudview.
The feed now displays cloudview in the drop zone.
5. Set its properties as needed. The following table describes the main properties of the CloudView Search feed.
Property
Description
Query
The dynamic query to send to the index.
For example the ${page.params["q"]} variable stands for parameter q applied to the current page.
Note: Using #all queries, to retrieve all documents, is not recommended since it can impact the performances of the search server.
Hits per page
Number of hits (results) to display per page.
Default User Query
The default query executed when the Query parameter is empty.
Properties/Mappings
The output format of the Mashup API is a standard XML output format, Atom .
This format has specific tags for defining the title or the thumbnail of an entry, this is why these parameters can be configured at the feed level, but they can also be configured on a hit displaying widget.
PRE: Maps the property before subfeeds execution.
POST: Maps the property after subfeeds execution.
6. Click Save.
Make parallel requests with feeds
Creating parallel requests is useful if you have different indexes or if you want to search for specific content in the same index using different queries.
The following use case describes how to proceed if you want your application to fetch hits from two sources using the same query basis:
• One of these source is a filesystem crawl retrieving data through a Files connector. In our example, the set of documents located under the <INSTALLDIR>/docs/ directory.
• The other one is a web crawl retrieving data through an HTTP connector. In our example, the Exalead website (http://www.exalead.com/software/).
Our application is configured in the Mashup Builder to use two CloudView Search feeds that will select the 2 most relevant hits for the request on the search results page ${page.params["q"]} to focus on the two specific data sources.
By making a query on the Mashup Builder, we see below that the search page displays results coming from the two data sources; one from an Exalead website URL and another from the filesystem.
Using more than one feed per page is only possible with Mashup Builder Premium.
This procedure describes the steps to create the example presented above.
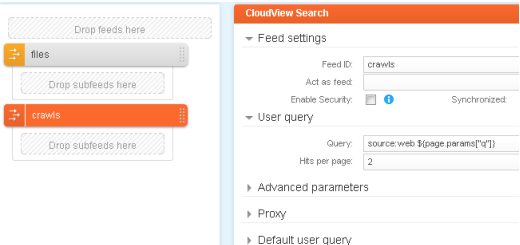
1. In Mashup Builder, open one of your application pages, for example search, and select the Feeds view.
2. Drag and drop a CloudView Search feed, and from the Feed ID field, call it files.
3. Set the feed properties as follows:
a. For User query > Query, enter for example source:fs ${page.params["q"]} (where fs stands for a file system source managed by a Files connector).
b. For User query > Hits per page, enter 2.
c. Under Properties / Mapping, for TITLE, enter ${entry.metas["file_name"]}
4. Drag and drop another CloudView Search feed below the first one, and call it crawls.
5. Set the feed properties as follows:
a. For User query > Query, enter for example source:web ${page.params["q"]} (where web stands for a web source managed by an HTTP connector).
b. For User query > Hits per page, enter 2.
The configuration should look as follows.
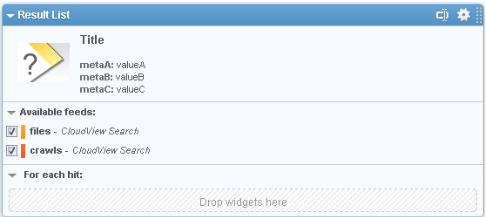
6. Select the Design view, and add the two feeds (files and crawls) to a widget, for example Result List.
7. Select the Preview to check your configuration changes.
8. Click Apply.
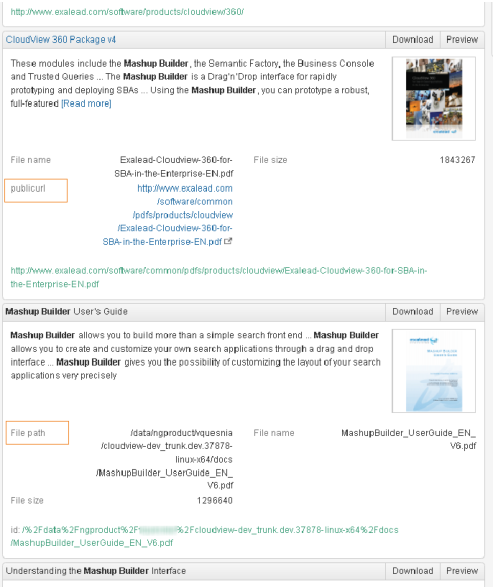
The Mashup Builder displays results coming from the 2 data sources.
Figure 3. Example of parallel requests on the Mashup Builder
Enrich hits with nested feeds
Nesting feeds in one another gives you the possibility of enriching the hits of a query with other sources to bring related content to the user. This can be achieved because nested feeds can use parent metas.
In the following use case, our application starts by retrieving information about TV series using a CloudView Search feed. It then tries to enrich each hit with images retrieved by a Google Search feed using the TV series title. We assume that the data source (http://www.allocine.fr/series/) is crawled by an HTTP connector called series, properly configured in the Administration Console.
Using more than one feed per page is only possible with Mashup Builder Premium.
1. In Mashup Builder, open one of your application pages, for example search, and select the Feeds view.
2. Drag and drop a CloudView Search feed and from the Feed ID field, call it tvseries.
3. Set the feed properties as follows:
a. For Query, enter source:series ${page.params["q"]} where source:series specifies the name of the HTTP connector that crawls TV series in the Administration Console.
b. For Hits per page, enter the number of hits to display on the search results page, for example 4
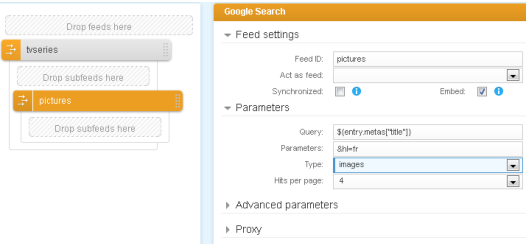
4. Drag and drop an Google Search feed within the CloudView Search feed, and call it pictures.
5. Set the feed properties as follows:
a. For Query, enter ${entry.metas["title"]} (the title meta for each result of the tvseriesCloudView Search feed).
b. For Type, select images.
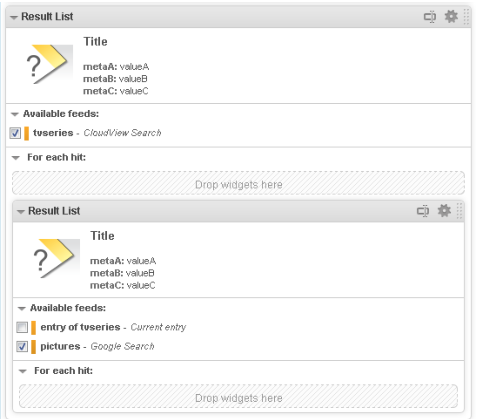
6. Select the Design view, and add the parent feed (tvseries) to a widget, for example Result List.
7. Expand for For each hit, and drag and drop another widget within the parent widget.
By default the nested feed (pictures) is selected in the second widget.
8. Select the Preview to check your configuration changes.
9. Click Apply.
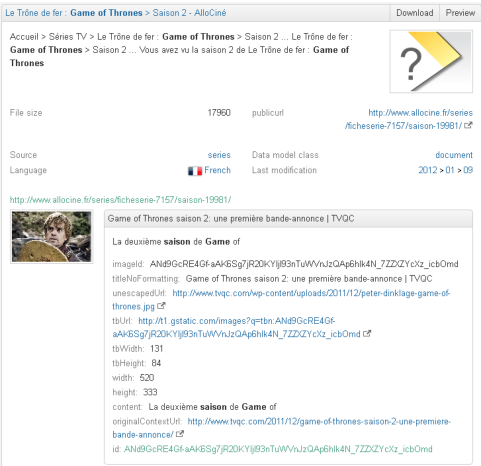
The Mashup UI displays results coming from the 2 data sources. The data retrieved by the HTTP connector is enriched by pictures retrieved by Google.
Figure 4. Example of hit enrichment in Mashup UI
Synchronizing feeds on a page
With Mashup Builder Premium, you can use more than one feed per page.
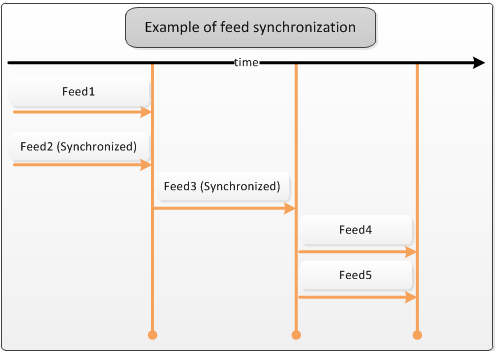
By default, feeds are executed in parallel but sometimes, you need to wait for the result from a previous feed to execute another feed. This can be done using the Synchronized option.
When you enable the synchronized option on one of your feeds, remember that feed order is important.
Feeds that are located after a synchronized feed will wait for it to answer before triggering themselves.
Enable security on a Exalead CloudView Search feed
The following procedure describes how to enable security on a CloudView Search feed. When the user authenticates on a page, the security provider retrieves his tokens from the security source(s) which in turn, sends the user’s query and the security tokens to the index.
The index only fetches documents that match both the user’s query and the security tokens.
For example, if a user has the Everybody and group1 tokens, and if security is enabled on the feed, Exalead CloudView will filter the documents and return only the documents matching Everybody and group1.
• A security source has been set in the Administration Console. For more information, see "Configuring security sources" in the Exalead CloudView Administration Guide.