Mashup Builder Premium gives you the possibility of adding plugins for feeds, widgets and triggers. You can therefore install and deploy custom components on your applications.
The following procedures explain how to install and manage a plugin in your application. It is basically a .zip file with custom code for a feed, widget, or trigger, that must be imported within Mashup Builder.
Install a plugin
1. In Mashup Builder, select Application from the top left menu bar.
2. Select Manage components > Plugins.
3. Click Upload plugin.
4. From the Upload Plugin dialog box, click Browse and select the plugin zip file.
The plugin is added to the list of plugins in the Installed plugins pane.
Uninstall a plugin
1. In Mashup Builder, select Application from the top left menu bar.
2. Select Manage components > Plugins.
3. Click the delete icon corresponding to the plugin to uninstall.
Uninstall a plugin manually
This procedure describes how to uninstall a plugin manually and cleanup all its references. This can be useful if a plugin breaks the search server or the gateway. In the following examples, the plugin to uninstall is called MyPlugin1.
1. Go to your <DATADIR>/gct/registeredPlugins/ directory and remove all references of MyPlugin1.
The following procedure details how to synchronize the plugins of a given application with another application. This action compares the plugins of your current application with the plugins of a source application. It then adds or deletes plugins on your current application so as to get exactly the same as those of the source application.
1. In Mashup Builder, select Application from the top left menu bar.
2. Select Manage components > Plugins.
3. Click Synchronize plugins.
A Synchronize plugins dialog box opens.
4. Select the source application from the drop-down list.
5. Click Continue.
Note: If you synchronize a plugin that already exists on the current application (a plugin with the same name), an error message will be displayed.
Import custom components
You can import custom components for the:
• MashupAPI: feeds, triggers, etc., from <DATADIR>/javabin/
• MashupUI: triggers, security providers, etc., from <DATADIR>/webapps/360-edm-mashup-ui/WEB-INF/lib
1. In Mashup Builder, select Application from the top left menu bar.
2. Select Manage component > Register Components.
3. Click Add new custom component and enter the full path of the custom class you want to import.
4. Click Save and apply the configuration.
Note: If you change the code of your registered components, do not forget to save, apply and restart the search servers to get your components correctly updated. The Restart search server processes option is accessible when you click Developer area > Reload components.
Use plugin controllers
Mashup Builder is based on a Spring Framework and uses an MVC (Model View Controller) model.
In Mashup Builder, several plugins embed Spring controllers. A controller can send commands to its associated view to change the view's presentation of the model. For example, a controller can launch queries to the Suggest service, take a URL and return a screenshot of the page, send an email, etc.
Once installed, controllers can be configured through the Mashup Builder interface. This avoids configuring the plugin XML file manually.
Note: For information on Controllers’ creation and packaging, see "Creating Controllers" in the Exalead CloudView Mashup Programmer's Guide.
1. In Mashup Builder, select Application from the top left menu bar.
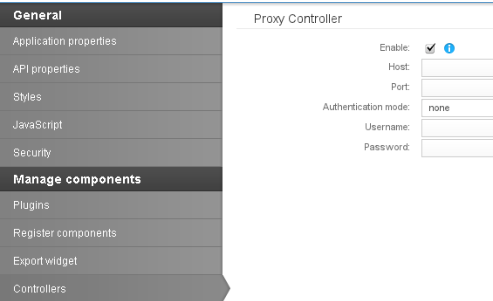
2. Select Manage component > Controllers.
3. Configure the plugins as needed using the controllers.
On the following screenshot, a Proxy plugin containing a controller has been installed and can therefore be seen under Controllers.
4. Restart the search servers to get your components correctly updated. The Restart search server processes option is accessible when you click Developer Area > Reload Components.
Export widget
If you have created custom widgets, either through the Widget Builder or through custom code, it can be useful to export them. You can do so to share your widgets as a plugins with other Exalead CloudView users, or simply to backup your widgets if necessary.
For more information about widget creation, see "Creating Widgets" in the Exalead CloudView Mashup Programmer's Guide.
1. In Mashup Builder, select Application from the top left menu bar.
2. Select Manage component > Export Widget.
3. Configure the widget to export as follows:
a. Widget: Select the widget to export.
b. Name: Give a name to your widget plugin.
c. Description: Enter a description.
d. Author: Enter the name of the widget’s creator.
4. Click Download this widget and save the widget plugin zip file.