In order to use Google Maps widget you must provide either:
• the textual address provided from hit meta such as city and country, or
• the GPS coordinates via a GPS point meta; this data must be provided from one of your sources and defined in the data model.
Note: If you a need a cartographic widget, you can also use the Maps widget which gives access to mapquest/openstreetmap OR to BING services.
Important: You must pay attention to license issues when using cartographic services! For Google and Bing, you can use the premium versions by defining your API key in the widget configuration. If no key is specified, you will use the light versions of these services.
Why use textual addresses
• To easily configure the Google Maps widget using the hit meta. This uses Google Maps API for the geocoding therefore, you don’t have to supply the GPS coordinates.
• To perform calculations such as distance (results in proximity) used for the search results in the Mashup UI.
Restrict the search results to a Geographical Area
You can configure your Mashup Builder to display a Google Maps widget on which the user will be able to draw a polygon or a circle and then launch a standard search on the specified geographical area, for example, a search on the restaurants of this area.
To use the Google Maps widget for geosearch you must provide the GPS coordinates via a GPS point meta; this data must be provided from one of your sources and defined in the data model.
The workflow to implement geosearch in the Mashup Builder is to:
• Prepare your data model.
• Restrict search results to a geographical area.
Prepare your data model for geographical search
To perform geographical search, you must provide the GPS coordinates via a GPS point meta. This data must be provided from one of your sources and defined in the data model as follows. Therefore, this procedure assumes that the coordinates data has already been indexed.
1. In the Administration Console, select Data Model > Classes.
2. Select the property from the data model that will supply GPS coordinates. For example, location.
3. For Data type, select GPS point.
4. Click Apply.
The index field document_location can now be referenced in the Mashup Builder as the geographical property to search with.
Link the Standard Search Form and the Google Maps widgets
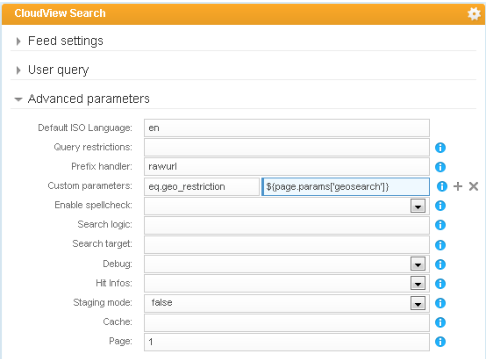
1. In Mashup Builder, select the Feeds view, add a parameter in Page parameters called geosearch that will be used for the geographic restriction.
2. In the Exalead CloudView Search feed, expand Advanced parameters and add a custom parameter named eq.geo_restriction and the geosearch page parameter for the value as shown below.
3. In the Design view, drag a Vizualization > Maps > Google Maps widget on the index page.
4. In the widget properties General panel, select the Enable geo form editing.
5. Click the header of the Standard Search Form widget to display its widget properties panel.
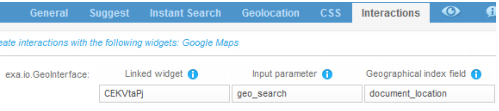
6. Select the Interactions tab and configure the exa.io.GeoInterface property to restrict the search on a specific geographical area.
a. For Linked widget, select your Google Maps widget from the contextual menu on the left.
b. For Input parameter for geoData, enter the Page parameter you created in step 2, for example geosearch.
c. For Meta name to search with, enter the index field name of the geographical property to search with. The format is <class>_<property>, for example, document_location. See Prepare your data model for geographical search.
7. Select the Preview to check your configuration changes.
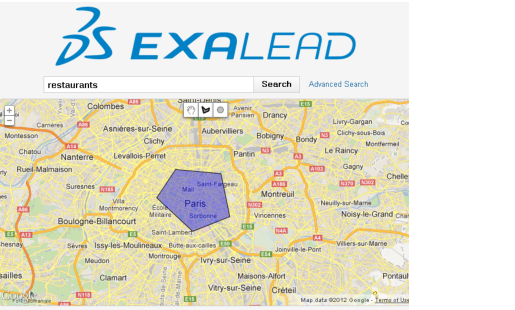
The Mashup Builder should display a Google Maps widget on which you can draw a polygon or a circle, and a standard search form to search for items in this area. Example of geographical search on Google Maps.
8. Click Apply.
Link the search results list to a Google map
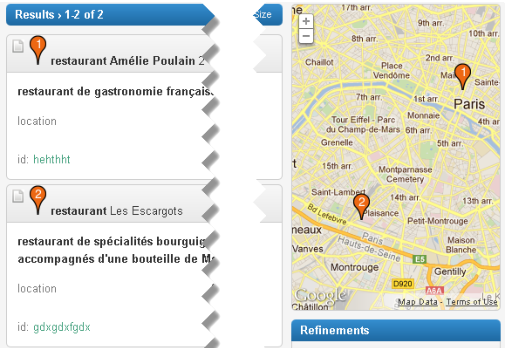
You can also link up the search results lists to pinpoints on the Google Maps widget using hit meta rather than GPS coordinates. For example, you can view the search results for restaurants and their associated pinpoint location on Google Maps.
1. Go to the /search page and select the Design view.
2. Drag a Vizualization > Maps > Google Maps widget on the page above the Standard Facets widget.
3. Click on the Google Maps widget header to display its properties.
4. Select the Based on Entries tab and then select the hit meta for the restaurant address in Address (1), for example,${entry.metas['address']}
Note: Alternatively, the Google Maps widget can reference an index field that contains GPS points for the Location property.
5. Click on the Result List widget header to display its properties.
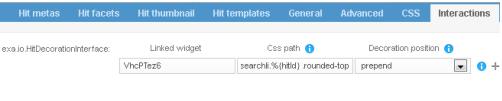
6. Select the Interactions tab and configure the exa.io.HitDecorationInterface property to add a gmap pinpoint next to the search result title. The aim is to link the search result pinpoint with a corresponding pinpoint on the gmap.
a. For Linked widget, select your Google Maps widget from the contextual menu on the left.
b. For Css path, select Default template > Header left from the contextual menu.
c. For Decoration position, choose whether to place the pinpoint before or after the search result title, for our example, prepend.
7. Select the Preview to check your configuration changes.
The search page of the Mashup Builder should display a list of results with pinpoints before each result title. Hovering on a search result pinpoint should refresh the Google Maps view to display the related entry.