Test the Analysis Pipeline with an Indexed Document
In this example, we index the PDF guides of the Exalead CloudView documentation. We change the Author name displayed in the hit content of search results. Instead of ‘EXALEAD R&D’, we want to display ‘EXALEAD’.
Add a Files Connector and Index the Documentation
You can add a new connector that includes the Exalead CloudView functional and reference product documentation. For this example, we keep most of the default parameters.
1. Open the Administration Console: http://<HOSTNAME>:<BASEPORT+1>/admin
2. Go to Index > Connectors and click Add connector.
3. Complete the fields as follows:
a. For Name, type Functional_guides
b. For Creation mode, select new.
c. For Type, select Files.
d. Click Accept.
The Functional_guides connector page is created.
Note: When creating connectors, always use intuitive names as by default, they appear as navigation facet in the Mashup UI.
4. On this connector Configuration page, go to the Filesystem paths section and enter the path:
◦ for UNIX platforms, /<INSTALLDIR>/docs/pdf
◦ for Windows platforms, <INSTALLDIR>\docs\pdf
5. Click Apply.
6. Go to the Home page and under the connectors list, click Scan next to the Functional_guides connector.
This triggers the indexing.
7. Go to the Mashup UI: http://<HOSTNAME>:<BASEPORT>/mashup-ui and enter #all in the search field.
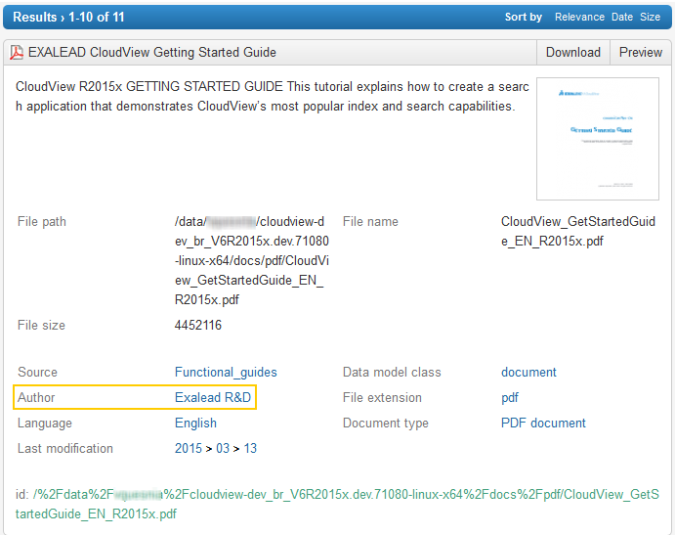
Search results are displayed.
Note: for each hit the Author meta displays Exalead R&D.
Figure 11. Hit with Author Meta Displaying Exalead R&D
Define the New Author Name
Once PDFs are indexed, the first thing you need to define is the new Author name to be displayed.
1. In the Administration Console, go to Index > Data Processing > Edit > Pipeline name (e.g. ap0) > Document Processors.
2. In Processor types, search for the Replace Values processor and add it above the rename_extracted_author processor.
3. Click the icon and rename this new processor: rename_exalead.
4. Define the following parameters:
a. Input from: extracted_author
b. String to replace: EXALEAD R&D
c. Replacement string: EXALEAD
5. Click Apply.
Test the Document Meta Processing
You can process a document to see how the modification is taken into account.
1. In the Administration Console, go to Index > Data Processing > Test.
2. In Select an indexed document, choose:
a. your connector’s name in Source: Functional_guides
b. the document to be processed in Document URI: CloudView_GetStartedGuide_EN_R2015x.pdf
3. Select your analysis pipeline (by default ap0).
4. Click Process.
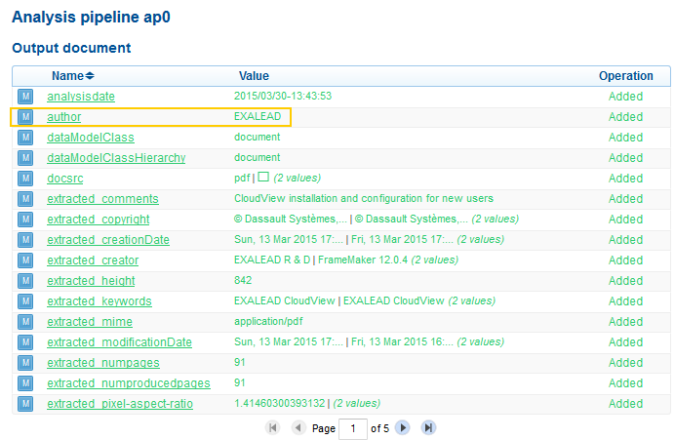
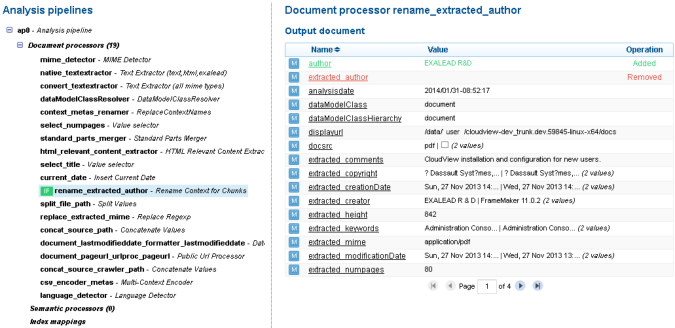
The list of generated metas and annotations is displayed on the right. You can see that the Author has been properly renamed ‘EXALEAD’. Metas have all been newly generated, that is why they are displayed in green.
Now you can take a closer look at what happened in the analysis pipeline.
Display the Analysis Pipeline Details
1. Look for the extracted_author meta using the Filter metas search filter on the right.
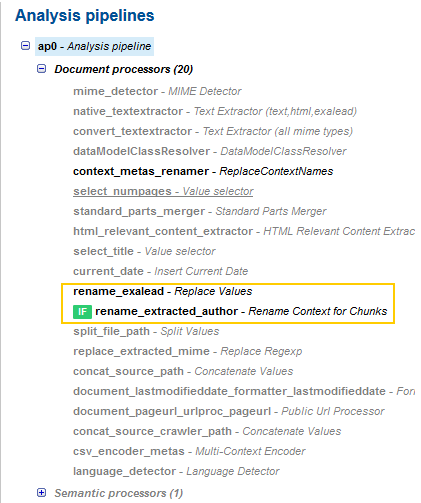
2. Select the analysis pipeline name (for example ap0) to expand it.
Only document and semantic processors using the extracted_author meta are active. You can see the two processors involved when renaming and extracting the Author.
Notice the green icon before the rename_extracted_author processor. It means that the condition defined for this processor is met.
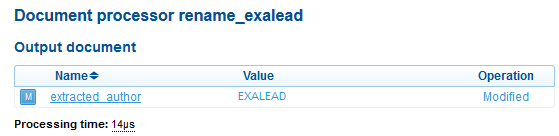
3. Select the rename_exalead processor.
You can see that the extracted_author meta is ‘EXALEAD’. This meta has been modified, that is why it is displayed in blue.
4. Select the rename_extracted_author processor.
You can see that the extracted_author meta has been removed. The final name is still ‘EXALEAD’.
5. Go to the Home page and click Clear documents from the Functional_guides connector.
6. Click Scan.
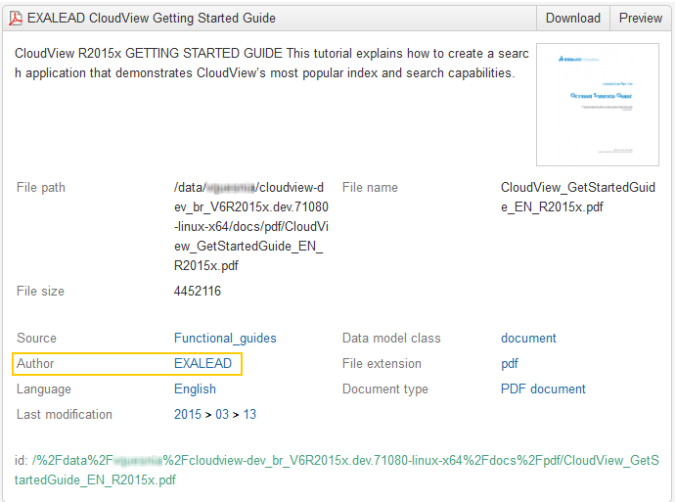
7. Once the scan is complete, go back to the Mashup UI page and refresh the view.
The Author meta now displays EXALEAD.
Test the Analysis Pipeline with a New Custom Document
You can push new test documents to the index.
1. In the Administration Console, go to Index > Data Processing > Test.
2. Select Create a custom document and click Edit document.
The Edit dialog box is displayed.
3. Enter the unique document identifier in URI and the time stamp (optional).
For example, myuri and 2015/03/28-08:00:00.
4. In the Metas section, set the meta details for the document in meta name and value.
For example, enter department as meta name and marketing as value.
5. Click Add meta to create new metas.
6. Click Upload file to select your document.
Your document is displayed with the name master. Click this name to display:
◦ the filename. For example, doc.
◦ the encoding type. For example, UTF-8.
◦ the mimeHint. For example, text/richtext.
7. Click Close.
8. Click Process.
You can now test the analysis pipeline using the displayed document processing information.
Display Document Processing Information
Display Meta Processing
The following elements are displayed for each document processor and semantic processor:
• Meta operation statuses: Added, Modified, Removed.
• Processor conditions:
◦ met
◦ not met
• Metas excluded from the index (Index mappings)
Display Annotation Processing
When clicking a meta name for a semantic processor, you can display:
• Annotations
• Tags, including
◦ Available forms
◦ Count
Display Internal Properties
You can also display parts and directives.
Details of the master part related to the mime_detector document processor:
Disable Processors and Options
You can change document and semantic processors anytime in the Edit tab. For example, you may need to disable processors or disable the document cache.
Disable a Processor
1. In the Edit tab, select your processor.
2. Select the Disable processor check box.
3. Display the Test tab.
4. The processor is grayed and indicated as (disabled).
Disable the Document Cache
If document cache is enabled for your build group in Deployment > Build groups, the Use document cache option is automatically enabled when testing your analysis pipeline. You can disable it to test the latest modified version of your document.
For more information, see "Document cache" in the Exalead CloudView Administration Guide.
Test the Semantic Processing of your Analysis Pipeline
When you add document or semantic processors to your pipeline, you may want to see its output.
To do so, you can use the semantic annotate function of the cvdebug command-line tool, located in the <DATADIR>/bin directory.
cvconsole cvdebug > semantic annotate [args]
Where possible arguments [args] are:
• [buildGroup] – Build group name (default: bg0)
• [context] – Context of the chunk (type: STRING)
• [language] – ISO code of the language (type: ISO_CODE)
• [pipeline] – Analysis pipeline to use (default: ap0)
• [value] – (Required) Text to process, standard input if missing (type: STRING)
Example:
Consider that our analysis configuration contains only one pipeline. This pipeline contains a single semantic processor, the Named Entities Matcher. This processor provides Named Entities annotations.
We start the semantic annotate function to test the Named Entities Matcher with the following textual input.
Note: For details about the XML tags, see Appendix - Semantic Resources Reference. Keep in mind that this XML output is a serialization of the underlying JAVA objects manipulated by the semantic pipeline.
This is how the XML processes the textual input:
• The pipeline processes each token ("Bill", " ", "Keller", " ", "B", ".", " ", "Obama") separately. We then obtain as many AnnotatedToken nodes as the number of tokens contained in the textual input.
• Each token goes through the pipeline and each processor generates one or many Annotation java objects that are appended to the AnnotatedToken object.
Focus on the two main attributes of an Annotation, tag and displayForm, which you can consider as (a key, value) describing the content of the Annotation.
◦ tag – the name of the annotation. For example, "Bill" is labeled as a first name using the tag "exalead.nlp.firstnames"
◦ displayForm – the value of the annotation (may be empty). This attribute is very useful for normalization purposes. For example, in a sentence containing "Barack Obama", "B. Obama", "Obama Barack", all these 3 N-grams may be annotated as "exalead.people" and with the same displayForm "Barack Obama".
• The Named Entities Matcher processor matches the "Bill" token since "Bill Keller" (the display form) is tagged by NE.person. We notice here that the Annotation object has an nbToken attribute set to 3. This reveals the way processors work:
◦ When treating a token (here "Bill"), the processor checks in its resources if the token matches with the beginning of a displayForm. If it is the case, the generated Annotation includes information about the number of tokens involved, for example, 3 for "Bill Keller".
Note: That processors work forward and never backward. They consider the tokens following the current one but not the previous ones.
Once the pipeline has produced these annotations, they may be mapped to produce as many index fields or categories as required.
 icon and rename this new processor: rename_exalead.