This section describes the main phases involved for data processing in the analysis pipeline, how to use pipeline conditions and how to configure the pipeline manually.
This section explains the document lifecycle through the various components of the Indexing Server.
In the Push API Server
When connectors send documents to the Indexing Server, they first arrive into the Push API server (PAPI server) of the Indexing Server.
When you push a document to the Push API Server, it contains:
• document URI
• document stamp to indicate the version
• meta data
• parts containing the bytes from the document
• directives for data extraction
In the Analysis Pipeline
Documents are then pushed to the analysis pipeline of the Indexing server.
The first step is to transform the content of the document parts and the metadata items into internal items that the document and semantic analysis processors can process. These internal items are called document chunks.
Note:
• Each document chunk is tagged as a context which name is case-sensitive.
• Created contexts depend on the extraction process. By default, it creates the text and title contexts for each part, and a context for each metadata item.
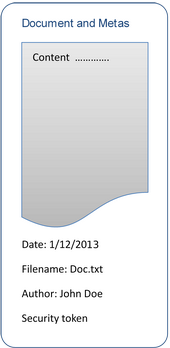
The following example shows the mapping of a document with one part and metadata items to several contexts.
Figure 8. Document and Metadata Mapped to Contexts
Once the document is represented as contexts with one or more document chunks, the analysis processors can process it. The processors can perform one of the following:
• create new contexts
• transform existing contexts
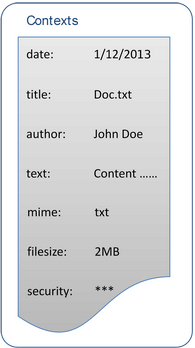
If you want to perform semantic analysis, you must tokenize the context. The semantic processor can create annotations for the tokens. The following example shows a possible representation of the document after analysis.
Figure 9. Contexts and Annotations after Document and Semantic Processing
In the Index
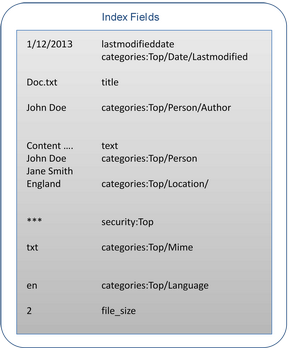
The final phase is the mapping of the contexts and the annotations to index fields so that the document may be used for search.
When a document matches a query the results contain hit fields, metadata (that can be different from the Push API metadata), categories, and related terms.
Figure 10. Document Mapped to Index Fields
Focus on Data Processing Phases in the Analysis Pipeline
Data processing involves the following phases in the Exalead CloudView analysis pipeline.
#
Phase
1
Document Processing provides a set of analysis filters that are able to modify the content of the documents for indexing. For example, the document's language and MIME type are automatically detected, and it is possible to use the result of this detection as a document category.
2
Contexts appear at the end of the document processing phase. You can find new or transformed content that can be mapped in the final phase to fields in the index.
3
Semantic Processing provides a set of semantic processors to detect related terms, perform semantic query processing, categorization thesaurus, extractions, and ontology matching.
4
Annotations provide additional information about a piece of text in the form of names, attributes, descriptions, and so on. They are attached to documents by semantic processors during analysis. To search on an annotation, map to an index field. To use for a facet, map to a category.
5
Use Content and Annotation Mapping to send data from multiple metas of the documents to the same field, or to send a given part of the document to multiple index fields, with multiple options. You can find in the index fields the heterogeneous content and annotations gathered from the connectors and created during the document analysis
The Analysis Pipeline Sequence of Processors
The Analysis pipeline defines a sequence of processors executed on a document before it is added to the index. These processors are:
• document processors, used for transforming document meta and content,
• and semantic processors, used for extracting structured information from unstructured document content.
The analysis pipeline processes documents one by one in a specified sequence determined by the order of the document and semantic processors. For each input document, the pipeline outputs exactly one document.
You can access the analysis pipeline in the Administration Console by going to Index > Data processing > Analysis pipelines, and selecting the pipeline name.
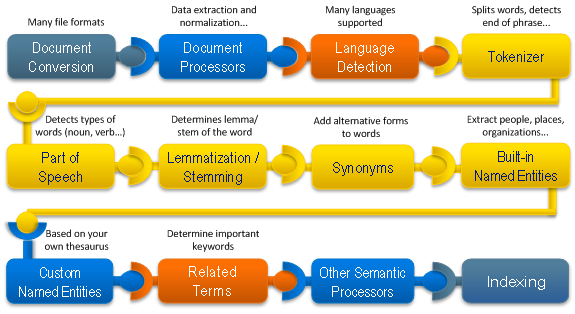
The following figure shows the typical analysis pipeline workflow.
Use Multiple Pipelines with Conditions
In the data processing configuration, you can have several analysis pipelines. Multiple pipelines allow for different processing depending on the document. Each pipeline has an associated condition, to determine which pipeline processes the document.
The order of document pipelines in the data processing configuration is important. As soon as a document pipeline is found with a valid accept condition, the document is dispatched to this pipeline.
1. Go to Index > Data processing > Analysis pipelines.
2. Expand the Condition section of an analysis pipeline, for example ap0.
3. Click Add condition.
4. Set the analysis pipeline condition.
Condition applies to...
If...
Metadata
The document metadata name equals of matches the specified name, and if its value:
• Exists
• Equals the specified value
• Contains the specified value
• Matches the specified value
• Does not exist
• Is not equal to the specified value
• Does not contain the specified value
• Does not match the specified value
Custom Directive
The document contains the specified custom directive set to the specified value.
Data model class
The document belongs to the data model class specified in your connector. This is controlled by the Connector > Configuration > Store documents in data model class parameter set on your connector.
If your connector does not specify a default data model class, this condition does not work.
Document source
The document comes from the specified connector source.
URL match
The document URL does or does not match the specified regular expression.
To avoid multiplying pipelines and therefore simplify the administration of the data processing configuration, you can also choose to group processors sharing a same trigger condition (typically on document source) within a same pipeline.
Using a single pipeline with collapsible groups of processors and sets of conditions is much easier to control and maintain.
Important: Some processors have dependencies, so be careful to make consistent groups including these dependencies. For example, the html relevant content extractor depends on the native text extractor, and both must therefore be included in the group to get a correct processing.
1. Go to Index > Data processing > Pipeline Name > Document Processors.
2. Drag the Other > Document Processor Group processor to the pipeline.
This processor acts as a container for other document processors.
3. Drag other document processors into the Document Processor Group processor.
You can sort these processors as required using the up and down arrows.
Note: To create subgroups, drag a Document Processor Group processor within the Document Processor Group container.
4. Optionally, you can add triggering condition on the:
◦ Document Processor Group processor so that its list of processors is executed when the specified condition is met (if any).
◦ Processors contained in the Document Processor Group processor.
Note: Icons flag processors with conditions.
Important: Document processing performance is linear depending on the number of conditions used in the pipeline. Use Equals conditions instead of Matches conditions in the Add condition dialog box.
5. Click Save.
Multiple Pipelines vs. Single Pipeline with Groups
Use a single pipeline when you have several document sources sharing common document processing and mappings.
For example, several filesystem sources with the same data model classes (title, text, Author, etc.).
Use multiple pipelines when indexing document sources that do not share the same data model classes.
Note: Each analysis pipeline has a fixed memory consumption regardless the number of processors. Having 2 pipelines with 10 processors each, uses therefore more memory than having 1 pipeline with 20 processors.
Configuring the Analysis Pipeline Manually
This section outlines the high-level procedure to configure an analysis pipeline with both document and semantic processors, and to display the output in the search logic.
To map data to index fields and categories, you must define:
1. The document processors to generate output contexts, or metas, based on the name specified in the Output to box.
2. The semantic processors to generate annotations.
3. Map all contexts and annotations to index fields or categories.
Before performing the mapping, you must create the target index fields under Index > Data Model > Advanced Schema.
You can then configure in Index > Data Processing > Mappings, a list of:
◦ metas and parts mapping document contexts to index fields
◦ annotations mapping document annotations to index fields
Important: All changes made to the analysis pipeline require clearing the index and reindexing data to avoid inconsistencies.
Map Document Processors Manually
1. Add document processors to the list of current processors, and define the output contexts (or metas) for them.
a. Go to Index > Data processing > pipeline name > Document Processors.
b. Drag the appropriate processor to the list.
c. Configure the processor.
2. Create index fields to store the contexts.
a. Go to Index > Data Model > Advanced Schema.
b. Click Add Field.
3. Define mappings for the new context generated by the document processors.
a. Go to Index > Data processing > pipeline name > Document Processors.
b. Select the Mappings subtab.
c. Click Add mapping source and create a mapping with the same name as the output context.
d. Click Add mapping target and select either Index field or Category field (for facet).
e. Under Details, configure indexing options for the index field or category field. The following table describes the most important ones.
Option
Description
Searchable
Preindexes the data for efficient lookup. This allows users to search for documents based on the available values in this index field.
Retrievable
Displays the content of the field in the hit content of the search results.
Indexing options
For each target field, you can configure the form of words to be indexed. Choose one of these:
• index exact form
• index lowercase form
• index normalized form (this removes accents and specifies the contents to lowercase)
You can also choose to index the position of separators to enable search within a string. Select this option for use with a "split" type prefix handler.
Map Semantic Processors Manually
1. Drag semantic processors to the list of current processors
a. Go to Index > Data processing > pipeline name > Semantic Processors.
b. Drag the appropriate processor to the list.
c. Configure the processor.
2. Define mappings for the new annotations generated by the semantic processors.
a. On the Mappings subtab, select Add mapping source.

 Icons flag processors with conditions.