Configuration : Troubleshooting : Troubleshooting Document Analysis
 
Troubleshooting Document Analysis
 
Identify the Cause of the Index Crash
Unexpected Search Behavior
Below is a list of potential issues with document analysis and their solutions.
Identify the Cause of the Index Crash
Unexpected Search Behavior
Identify the Cause of the Index Crash
The following procedure describes how to identify the cause of the crash.
1. Go to the log.log file in <DATADIR>\run\indexingserver-bg0\
2. Look for ‘ERROR’.
3. You need to locate:
document URI
processor type
method
The document URI is added to the block list file indexing_uri_blacklist.txt in <DATADIR>\gct. It is not indexed anymore.
4. Contact support for advanced analysis (file format, character strings etc.).
Example:
@@CRITICAL ERROR with "/%2Fdata%2Fcorpus%2Fdepeches%2Fvrac%2Ffr/3_2006-06-21T1226_FAP4251.txt"
in LanguageDetector_process (com.exalead.indexing.analysis.processors.cpp:622):
caught abort (signal 6) from tkill (code -6)
Key elements are:
document URI: 3_2006-06-21T1226_FAP4251.txt
processor type: LanguageDetector
method: process
Unexpected Search Behavior
Search for Issues in Document Processing
Follow the steps below to identify document processor issues.
Step 1 - to Add log Information
To display detailed chunks in the log.log file, you must first add a Debug Processor element to your document processors list.
1. From the Administration Console, go to Index > Data processing > Pipeline name.
2. In the Document Processors tab, click Other in the Processor types menu.
3. Drag the Debug Processor element to the end of the processors list.
Example: <Debug> tags are displayed:
[2013/09/23-09:54:11.584] [info] [AnalyzerThread-bg0-default_model-1] [analysis.debug] uri:
C:\Users\E7G\Downloads\traffic.csv8 source: RATP did: 57 slice: 0: DebugProcessor: dumping
C:\Users\E7G\Downloads\traffic.csv8DebugProcessor: dumping C:\Users\E7G\Downloads\traffic.csv8:
<DebugChunk type="TextChunk" ctx="ville" deleted="false" part="null" value="Paris" score=0 language="xx">
</DebugChunk>
<DebugChunk type="TextChunk" ctx="arrondissement" deleted="false" part="null" value="1" score=0
language="xx"> </DebugChunk>
<DebugChunk type="TextChunk" ctx="source" deleted="false" part="null" value="RATP" score=0 language="xx">
</DebugChunk>
Step 2 - to Submit Document Using cvdebug
1. Submit your document to test processors in your pipeline:
cvconsole cvdebug> analysis analyze path=<PATH_TO_DOCUMENT>
For example, submit a .CSV file.
cvconsole cvdebug> analysis analyze path=/tests/myfile.csv
The output is a mapping of contexts and chunk values.
<TestAnalysisPipelineOutput xmlns="com.exalead.indexing.analysis.v10" documentProcessorsTimeUS=1000
semanticAndMappingTimeUS=0>
<##default>
<DocumentProcessorsOutput xmlns="com.exalead.indexing.analysis.v10">
<Document>
<Document xmlns="com.exalead.ndoc.v10">
<element>
[
<Context xmlns="com.exalead.ndoc.v10" language="xx" name="source"/>,
<ScoreContext xmlns="com.exalead.ndoc.v10" value=0/>,
<Chunk xmlns="com.exalead.ndoc.v10" value="sourceTest"/>,
<Context xmlns="com.exalead.ndoc.v10" language="xx" name="uri"/>,
<ScoreContext xmlns="com.exalead.ndoc.v10" value=0/>,
<Chunk xmlns="com.exalead.ndoc.v10" value="C:\Users\E7G\Downloads\traffic2.csv"/>,
<Context xmlns="com.exalead.ndoc.v10" language="xx" name="extracted_mime"/>,
<ScoreContext xmlns="com.exalead.ndoc.v10" value=0/>,
<Chunk xmlns="com.exalead.ndoc.v10" value="text/plain"/>,
<Context xmlns="com.exalead.ndoc.v10" language="xx" name="mime"/>,
<ScoreContext xmlns="com.exalead.ndoc.v10" value=0/>,
<Chunk xmlns="com.exalead.ndoc.v10" value="text#plain"/>,
<Context xmlns="com.exalead.ndoc.v10" language="xx" name="docsrc"/>,
<ScoreContext xmlns="com.exalead.ndoc.v10" value=0/>,
<Chunk xmlns="com.exalead.ndoc.v10" value="txt"/>,
<Context xmlns="com.exalead.ndoc.v10" language="xx" name="text"/>,
<ScoreContext xmlns="com.exalead.ndoc.v10" value=0/>,
<Chunk xmlns="com.exalead.ndoc.v10" value="Rang,Reseau,Station,Trafic,Correspondances,
c1,c2,c3,c4,Ville,Arrondissement1,MΘtro,GARE DU NORD,&quot;48,146,629&quot;,4,5,0,0,0,Paris,102,
MΘtro,SAINT-LAZARE,&quot;46,790,941&quot;,3,9,12,13,14,Paris,8"/>,
</element>
</Document>
</Document>
</DocumentProcessorsOutput>
</##default>
<##default>
<UnmappedContexts xmlns="com.exalead.indexing.analysis.v10">
<StringValue>
[
<StringValue xmlns="exa.bee" value="docsrc"/>,
<StringValue xmlns="exa.bee" value="extracted_mime"/>,
<StringValue xmlns="exa.bee" value="source"/>
]
</StringValue>
</UnmappedContexts>
</##default>
</TestAnalysisPipelineOutput>
Search for Issues in Semantic Processor
You can follow the steps below to identify semantic processor issues.
Step 1 - Display Semantic Processors for Each Document
To display detailed information on semantic processing in an HTML file, you must first add a Debug Processor element to your semantic processors list.
Important: The HTML output is verbose. You can use sample data to avoid using large amounts of disk space during indexing.
1. From the Administration Console, go to Index > Data processing > Pipeline name.
2. In the Semantic Processors tab, drag the Debug Processor to the end of the proces­sors list.
3. In the Input from field, specify the HTML file in which information is logged.
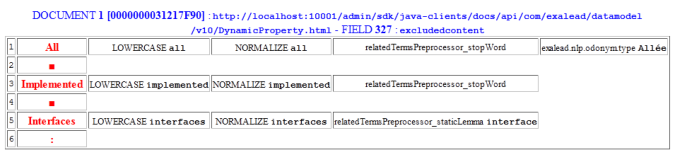
Example: all semantic processing applied to field 327 of document [0000000031217F90]
Step 2 - Submit Text or Document
1. Submit text through the semantic pipeline to display all running processors:
Using a single word:
cvconsole cvdebug> semantic annotate language=en context=text value=”WORD”
Using a text block (.TXT file):
cvconsole cvdebug> semantic annotate-file language=en path=<PATH_TO_TXT_FILE>
Example: submit the word ‘test’
cvconsole cvdebug> semantic annotate language=en context=text value=”test”
The output displays tokens tagged with annotations:
<AnnotatedToken id="0" kind="TOKEN_SEP_PUNCT" lang="en" token="ΓÇ¥" offset="0" />
<AnnotatedToken id="1" kind="TOKEN_ALPHA" lang="en" token="test" offset="3" >
<Annotation TID="7" kind="LOWERCASE" id="0" nbTokens="1" display="test" displayKind="lower"
trustLevel="0" />
<Annotation TID="8" kind="NORMALIZE" id="1" nbTokens="1" display="test" displayKind="norm"
trustLevel="0" />
<Annotation TID="20" kind="phonetic" id="2" nbTokens="1" display="T.E.S.T" displayKind="norm"
trustLevel="100" />
<Annotation TID="23" kind="relatedTermsPreprocessor_staticLemma" id="3" nbTokens="1" display="test"
displayKind="norm" trustLevel="100" />
</AnnotatedToken>
<AnnotatedToken id="2" kind="TOKEN_SEP_PUNCT" lang="en" token="ΓÇ¥" offset="7" />
<AnnotatedToken token="ö" kind="PUNCT" lang="en" offset="0 ">
</AnnotatedToken>
<AnnotatedToken token="test" kind="ALPHA" lang="en" offset="1">
<Annotation displayForm="test" displayKind="lowercase" tag="LOWERCASE" nbTokens="1" trustLevel="0" />
<Annotation displayForm="test" displayKind="normalized" tag="NORMALIZE" nbTokens="1" trustLevel="0" />
<Annotation displayForm="T.E.S.T" displayKind="normalized" tag="phonetic" nbTokens="1"
trustLevel="100" />
<Annotation displayForm="test" displayKind="normalized" tag="relatedTermsPreprocessor_staticLemma"
nbTokens="1" trustLevel="100" />
</AnnotatedToken>
<AnnotatedToken token="ö" kind="PUNCT" lang="en " offset="5 ">
</AnnotatedToken>
Step 3 - Display All Processors
1. Display the list of semantic processors in the analysis pipeline using cvdebug:
cvconsole cvdebug> semantic dump-pipe
The output (extract) displays each semantic processor and resources:
<Processor>
[
<Normalizer xmlns="com.exalead.mot.components" resource="exalead.891136526.normalizer.resource"
trustLevel="0"
normalizeCJ="true"/>,
<GermanTokenizer xmlns="com.exalead.mot.components"
normalizerResource="exalead.891136526.normalizer.resource"
splitPolicy="keepToken3" useCustomNormalizationTID="true" stickTokens="false"
resource="exalead.subtokenizer.de.resource"/>,
<DutchTokenizer xmlns="com.exalead.mot.components"
normalizerResource="exalead.891136526.normalizer.resource"
splitPolicy="keepToken3" useCustomNormalizationTID="true" stickTokens="false"
resource="exalead.subtokenizer.nl.resource"/>,
<NorwegianTokenizer xmlns="com.exalead.mot.components"
normalizerResource="exalead.891136526.normalizer.resource"
splitPolicy="keepToken3" useCustomNormalizationTID="true" stickTokens="false"
resource="exalead.subtokenizer.no.resource"/>,
<JapaneseCharDetector xmlns="com.exalead.mot.components"/>,
<CJKProcessor xmlns="com.exalead.mot.components"/>
]
</Processor>