This section explains how to create geographic points in Exalead CloudView
Note: To keep high performance, Exalead CloudView distance calculation uses an efficient but approximative algorithm, which may introduce precision errors up to 0.2%.
Note: For information about geographic facets, see Geographic Facets.
Exalead CloudView supports the following geographic coordinates:
• GPS fields, also called WGS84, that are a latitude and a longitude expressed in decimal.
• XY fields, also called Meter, that are two integers used on a map.
GPS Points
GPS points are indexed in decimal format, to an accuracy of 6 decimal places (which represents on average an accuracy of 10cm on Earth). A meta consists of two double values separated by commas.
Example: 37.818667,-122.478383 is a valid meta.
XY Points
XY points consist of two integer values, separated by commas.
Example: 125, 8215 is a valid meta.
No unit is defined, so you can consider the unit as meters, miles, or whatever unit you need.
Create a Geographic Point
Geographic search is available through the Point field type.
For an example of creating a geographic point and using it to perform a geographic search in Mashup UI, see the "Restrict the search results to a Geographical Area" in the Exalead CloudView Mashup Builder User's Guide.
Create a Point Using the Data Model
1. In the Administration Console, go to Index > Data model > Classes.
2. Click Add property.
◦ Give a name to the property.
◦ For Data type, select either GPS point or XY point.
◦ Click Accept.
3. Optionally, select Use separate metas for each coordinate if latitude/ X and Longitude/ Y come from two different metas in your data source. Exalead CloudView concatenates the two coordinates to store them in a single index field.
4. Click Apply.
The Data model configures the Index Schema and the Mapping automatically.
Create a Point Field Using the Index Schema
To enable the feature, you need to set the parameter indexExact to false in<DATADIR>/config/IndexSchemaList.xml
1. In the Administration Console, go to Index > Data model > Advanced Schema.
2. Click Add field.
◦ Give a name to the field.
◦ Select the Point type.
3. For the Geographical coordinates type, select WGS84 (GPS) or Meter (XY).
4. In Index > Data processing > Pipeline name > Mappings, add a new mapping and a new target.
5. Under Indexing options, select Index exact form. You can clear all the other indexing options.
6. Click Apply.
Search a Geographic Point
You can search a geographical point:
• in ELLQL, in the search-api.
• in UQL, using the geo: prefix handler.
You can search for a point by radius or within a polygon.
retrieves all the documents where the geographic field is located distance_in_meters from the specified lat, lng
geo:DISTANCE(48.33, 2.51, 250000)
Use UQL with ELLQL for Geographical Search
1. You can mix UQL queries with ELLQL, for example:
eq=#and(#distance(gps, 3.4, 4.3, 100) #uql("query in uql OR file_size<100"))
Calculate Distances in Virtual Fields
You can calculate distance using virtual fields that are based on retrievable index fields. These distances can then display as hit meta.
• When #distance is used with a name, @thename.distance returns the distance to the center. It is also possible to use #dist(pointField, lat/x, lng/y) to return the distance of the point to (lat, lng) or (x, y) depending on the coordinate format.
• When GPS points are used the distance is in meters.
You can also use #lat(point) to get the latitude or the X component of a point, and #lng(point) to get the longitude or the Y component of a point.
Use Geolocation Based on Place Detection
Exalead CloudView is delivered with two resource files to enable geolocation based on place detection in your search results. They include a predefined list of cities with gps coordinates.
This section describes the procedures to follow to use geolocation based on place detection.
Step 1 - Add an Ontology Matcher and Annotation Manager to the Analysis Pipeline
1. In the Administration Console, go to Index > Data processing > Pipeline name > Semantic Processors.
2. Drag an Ontology Matcher processor to the list of current processors.
3. Click the Ontology Matcher link to expand the view, and in Resource directory, enter:
resource://namedentities/geoloc/geoloc.bin
4. Add an Annotation Manager processor after the Ontology Matcher.
5. Click the Annotation Manager link to expand the view, and in Resource file, enter:
resource://namedentities/geoloc/selectmostfrequentgeoloc.xml (this resource uses the geoloc.bin resource defined above).
Step 2 - Create a New GPS Point Index Field
1. Go to Index > Data model > Classes
2. Click Add property and for:
a. Name, enter selected_geoloc.
b. Data type, select GPS point.
c. Field type, select Dedicated field only.
3. Expand Other advanced options and select Multivalued.
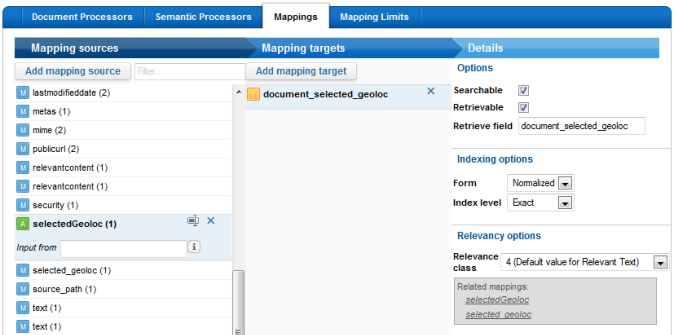
Step 3 - Add a Mapping Source and a Mapping Target
1. Go to Index > Data processing > Pipeline name > Mappings
2. Click Add mapping source and for:
a. Name, enter the annotation name selectedGeoloc (this annotation is delivered by the annotation manager with the documentAnnotation attribute)
b. Type, select Annotation.
3. Click Add mapping target and for:
a. Type, select index field
b. Name, enter document_selected_geoloc
4. Click Apply
5. Import documents with your connectors.
Step 4 - Add the Google Maps Widget to Your Mashup UI Application
1. In Mashup Builder, go to the /search page, and select the Design view
2. In the Widgets panel, select Visualizations > Maps, and drag the Google Maps widget on the page.
3. Click the Google Maps widget header. The widget properties panel opens at the bottom of the screen.
4. In the Based on entries tab, edit location (2) with the following MEL expression: ${entry.metas["selected_geoloc"]}
5. Click Apply.
You can now enter queries in your Mashup UI application and see all the locations detected in the search results on the Google Maps widget.